
Smart Locker Kiosk Site Survey: What System Integrators Should Check Before Installation

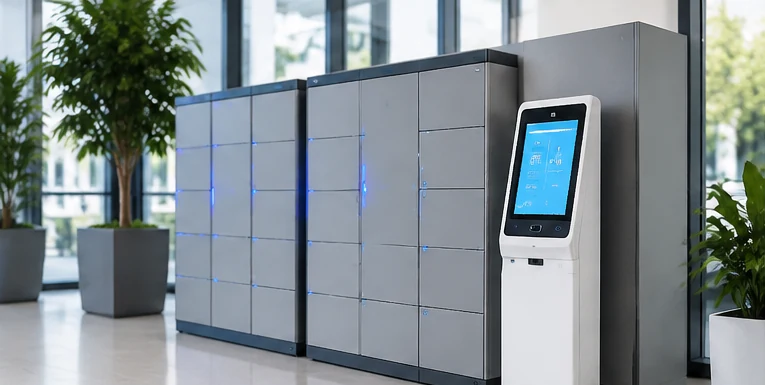
A smart locker site survey checklist is an important starting point for any kiosk integration project. It helps system integrators identify potential installation problems before the kiosk enclosure and locker layout are finalized.
Then the equipment arrives at the installation site, and small details start causing problems.
There may not be enough room for a locker door to open fully. The kiosk screen may be difficult to reach from the natural customer approach. A network connection that looked fine during the initial survey may not work reliably once the metal locker cabinets are installed. Even something as simple as replacing a printer paper roll can become inconvenient if the service panel is poorly positioned.
These are not necessarily hardware defects. They are often the result of installation conditions that were overlooked during the early design stage.
For kiosk manufacturers, locker suppliers and system integrators, a site survey is an important part of the project, not just a preliminary measurement exercise.
Before the kiosk enclosure and locker layout are finalized, the team needs to understand how people will use the system, where each component will be installed, how the equipment will be connected and how it will be maintained.
This guide looks at the practical points worth checking before moving a smart locker kiosk project into production and installation.
1. Understand How the Locker System Will Be Used
Before measuring the installation area, take some time to understand the actual application.
A parcel locker in a shopping mall has different requirements from an employee locker system in an office building. A retail click-and-collect installation may experience heavy customer traffic at certain times, while a campus locker system may need to accommodate several user groups.
These differences affect where the kiosk should be placed and how much space should be reserved around it.
For example, a parcel locker may need to accommodate both couriers depositing packages and customers collecting them. If both activities take place in the same area, the layout should allow people to use the terminal without blocking access to the compartments.
For workplace lockers, the main concern may be the number of employees accessing their lockers during shift changes. In a retail environment, shopping carts and customers carrying large packages may need additional space.
Before the site visit, establish a few basic project details:
- What is the main application: parcel pickup, workplace storage, retail collection or something else?
- Who will use the system?
- Will users identify themselves through QR codes, RFID cards, PINs or another method?
- Does the kiosk operate separately from the locker cabinet, or is it built into the cabinet?
- How many compartments are planned?
- Will the system be installed at one location or across multiple sites?
You do not need a complete engineering specification at this stage. The purpose is to understand the intended workflow so that the site survey focuses on the right things.
2. Make Sure the Proposed Layout Works in Practice
One common mistake in kiosk projects is approving a layout simply because all the equipment fits within the available space.
Physical fit and practical usability are two different things.
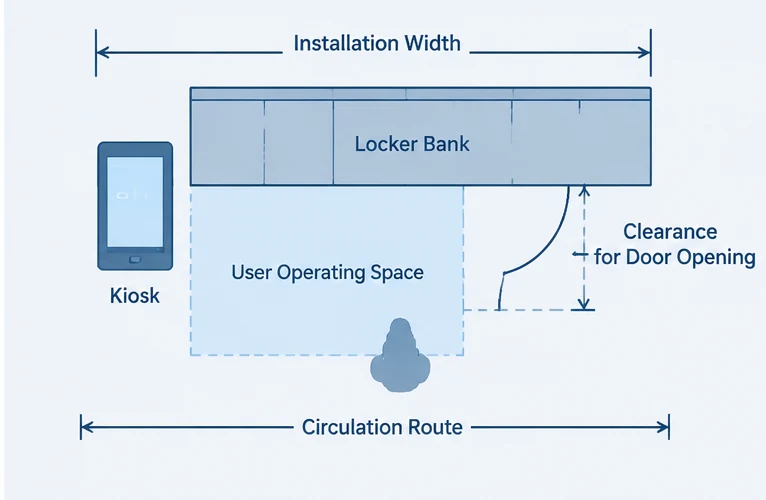
A locker cabinet may fit neatly against a wall, but what happens when a customer opens a large compartment? Is there enough room to remove a package? Can another person pass behind them? Does an open locker door interfere with the kiosk or an adjacent cabinet?
These questions are easier to answer before the mechanical drawings are finalized.
During the site survey, measure the actual installation area rather than relying only on architectural drawings. Record the available wall width, floor depth, ceiling height and any nearby obstacles such as columns, doors or existing equipment.
Pay particular attention to:
Locker door clearance
Check the opening direction of the compartments and whether doors can open fully without hitting nearby objects.
User approach
Customers should be able to reach the touchscreen, scan a code and collect their items without having to stand in an awkward position.
Circulation space
People waiting to use the kiosk should not block entrances, corridors or access to other lockers.
Installation access
The equipment must be brought into the building and positioned before it can be used. Check the delivery route, doorway dimensions and any restrictions on moving large cabinet sections.
A simple dimensioned floor plan, supported by photographs of the actual site, is often more useful than a collection of approximate measurements.
A well-prepared smart locker site survey checklist should include these measurements, supported by photographs of the actual installation area.
A practical smart locker site survey checklist should include these measurements, supported by photographs of the actual installation area.
3. Decide Where the Kiosk Terminal Should Go
The kiosk terminal deserves particular attention because it is the main point of interaction between the user and the locker system.
There are two common arrangements.
A standalone kiosk is installed separately from the locker bank. This gives the project team more freedom when deciding where the terminal should be positioned and can make servicing easier.
An integrated kiosk is built into or attached directly to the locker cabinet. This can produce a more compact installation, but the mechanical design, internal space and cable routing need to be coordinated much earlier.
Neither arrangement is automatically better. The decision depends on the cabinet structure, available space, user workflow and maintenance requirements.
When reviewing the proposed position, look at the installation from the customer’s perspective.
Can someone entering the area immediately identify where to use the kiosk? Is the screen in a comfortable operating position? Can a customer complete the transaction while another person is collecting an item from a nearby compartment?
Also think about what happens during busy periods. A layout that works well for one person may become inconvenient when several people arrive at the same time.
For integrated designs, these decisions should be made before the cabinet manufacturer freezes the mechanical drawings. Moving a terminal later may affect the front panel, internal brackets, cable openings and even the compartment arrangement.
4. Include Accessibility in the Initial Design
Accessibility is much easier to address during the layout stage than after the equipment has been manufactured.
The site survey should look at the complete user journey, including the route to the kiosk, the operating position of the touchscreen and the ability to reach the relevant locker compartments.
The team should also consider how users with different mobility requirements approach the terminal and retrieve their items.
For projects in the United States, the 2010 ADA Standards for Accessible Design provide relevant requirements for accessible routes, clear floor space and reach ranges.
ISO 21542:2021 is another useful reference covering accessibility and usability in the built environment.
The applicable requirements will depend on the destination country and the project location. These standards should be reviewed alongside local building and accessibility regulations rather than treated as universal dimensions.
5. Check Power and Network Connections at the Actual Installation Position
Power and network requirements are sometimes left until the installation stage. This can create unnecessary changes to the kiosk enclosure or site wiring.
It is better to confirm them during the initial survey.
Start with the power requirements of the complete system. The kiosk host, touchscreen, scanner, printer, locker controller and electronic locks may have different power requirements.
The project team should establish which devices use the main power supply, which require separate DC supplies and whether any devices have significant peak-current requirements.
Do not size the power supply using only the standby current of each component. Consider which devices may operate simultaneously.
Electrical distribution, grounding and protection arrangements should be reviewed by qualified personnel in accordance with the applicable local requirements.
Network connectivity needs the same attention.
Some installations use Ethernet between the kiosk and the local network. Others may use Wi-Fi or cellular connectivity, depending on the site and system architecture.
If wireless communication is planned, test it at the actual kiosk position. Metal locker cabinets and surrounding structures can affect wireless performance. A signal that appears adequate before installation may behave differently once the complete equipment is in place.
It is also worth involving the customer’s IT team early. Confirm IP addressing, firewall rules, required ports, VPN access and remote support arrangements before the system is deployed.
One question that should never be left unanswered is what happens if the network connection is interrupted.
Can users still access certain functions? Does the kiosk need to display an error message? What happens to a transaction that was in progress?
These are software and system-level decisions, but they directly affect the hardware installation and commissioning plan.
6. Confirm the Hardware Interfaces Before Ordering the Equipment
A smart locker kiosk usually contains several devices that need to work together.
Depending on the application, the list may include a touchscreen, industrial computer, QR scanner, RFID reader, printer, payment terminal and locker controller.
The important point is not simply whether each device has the right connector. The complete system must support the required communication and software integration.
For each device, record its model, interface, power requirement and available software resources.
| Device | Information to confirm |
|---|---|
| Industrial PC | Operating system, USB, serial and network interfaces |
| QR / Barcode Scanner | Interface, supported code types and communication method |
| RFID Reader | Card technology, interface and software requirements |
| Printer | Paper format, interface, driver or SDK |
| Locker Controller | Communication interface and protocol documentation |
| Payment Terminal | Physical connection and integration responsibility |
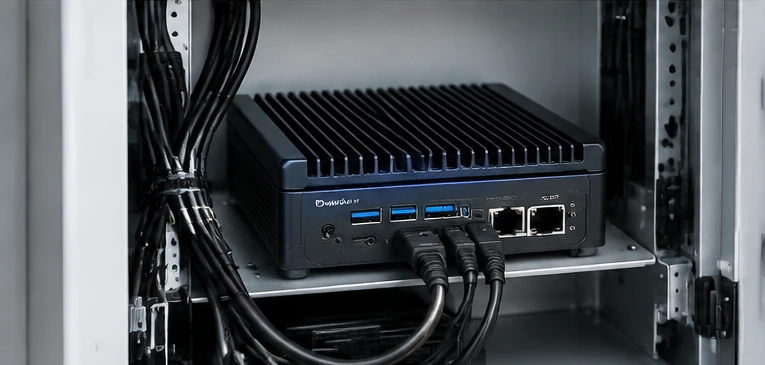
For example, the SNR-IBC-N8 Industrial Fanless Mini PC provides USB, RS-232 and dual Gigabit Ethernet connectivity. It can be evaluated as the kiosk-side host when these interfaces match the selected peripherals and software environment.
However, having an available RS-232 port does not automatically mean that a particular locker controller is compatible. The controller protocol, command definitions and software resources still need to be confirmed.
This is why we recommend collecting the peripheral specifications and controller documentation before finalizing the industrial PC configuration.
For a more detailed discussion of command handling, controller responses and physical door feedback, see our separate Smart Locker Controller Integration Guide.
7. Think About Maintenance Before the Enclosure Is Finished
Maintenance access is easy to overlook when everyone is focused on the external appearance of the kiosk.
But once the equipment is installed, even a small design issue can make routine service unnecessarily difficult.
Imagine a printer that needs a paper roll replacement. If the paper compartment is blocked by another module, the technician may have to remove part of the assembly just to complete a simple maintenance task.
The same applies to scanners, industrial computers and controller boards.
Before approving the enclosure, check whether technicians can reach the components that may need regular inspection or replacement.
Typical considerations include:
- Touchscreen cleaning and replacement.
- Scanner lens cleaning and alignment.
- Printer paper replacement and jam recovery.
- Card reader inspection where applicable.
- Industrial PC connector access.
- Locker controller diagnostics.
- Access to locks, hinges and service panels.
If a printer is part of the configuration, the paper-loading direction and service opening should be considered in the mechanical design.
An SNR-EP8305 80mm Thermal Panel Printer, for example, may be evaluated for projects requiring an integrated thermal printing module. Its mounting position and paper-loading access should be checked against the final enclosure drawing.
Also agree on who will be responsible for routine maintenance after installation. The kiosk manufacturer, locker supplier, local service provider and site operator may have different responsibilities.

8. Evaluate the Installation Environment
An industrial computer may be suitable for a demanding application, but that does not automatically make the complete kiosk suitable for an outdoor location.
The enclosure, ventilation, cable entries and every installed component need to be considered together.
During the site survey, record whether the equipment will be installed indoors, in a semi-outdoor area or fully outdoors.
Pay attention to direct sunlight, dust, humidity, condensation, rain exposure and the expected ambient temperature.
Ventilation is another important consideration, especially when the kiosk contains several electronic devices inside a relatively compact enclosure.
For outdoor installations, the project team should establish the required environmental protection level for the complete assembly. Do not assume that one component’s operating-temperature specification or IP rating applies to the finished kiosk.
The final enclosure design should be evaluated against the actual site conditions and the applicable project requirements.
9. Prepare the Installation and Commissioning Plan Early
A kiosk that works on an engineering bench has not necessarily been proven in its final installation.
The cabinet, mounting structure, cable routing and actual operating environment can all affect the result.
Before shipment, the project team should have an approved installation drawing, final hardware configuration, wiring information and a clear commissioning plan.
Once the equipment reaches the site, the main checks should cover:
- Mechanical installation and mounting.
- Power supply and network connections.
- Host computer startup.
- Peripheral communication.
- Locker controller communication.
- Compartment selection and addressing.
- Expected lock operation and available door feedback.
- Complete pickup or deposit transactions.
- Agreed error-handling and recovery procedures.
- Maintenance access.
Testing should follow the actual project workflow. For example, a successful unlock command does not necessarily prove that the physical door opened or that the user completed the collection process.
The meaning of controller responses and available door-status feedback should be confirmed with the selected system provider.
What Should Be Included in the Handover?
For projects involving several suppliers, good documentation saves time later.
At a minimum, the handover package should identify:
- Final installation and as-built drawings.
- Hardware models and configurations.
- Wiring and interface information.
- Network configuration.
- Locker and controller mapping.
- Approved software and firmware versions.
- Commissioning results.
- Outstanding issues.
- Maintenance and support contacts.
For multi-site deployments, keeping this information consistent is particularly important. It makes future installation, replacement and troubleshooting much easier.
10. Agree on Responsibilities Before Installation
Smart locker projects often involve several different suppliers.
The kiosk manufacturer may supply the terminal and peripherals. Another company may manufacture the locker cabinets. A third party may provide the controller, electronic locks or management software.
Problems can arise when each party assumes that another supplier is responsible for a particular connection or function.
A responsibility matrix helps avoid this.
| Project party | Responsibility to define |
|---|---|
| Kiosk OEM / Integrator | Kiosk enclosure, terminal placement, host and peripheral integration |
| Locker Cabinet Supplier | Cabinet structure, compartment layout and mechanical installation |
| Locker Controller Supplier | Controller interface, lock connections and available status feedback |
| Software Provider | User authentication, locker assignment, transaction logic and backend communication |
| Site Owner / Facilities | Site access, installation location, utilities and building coordination |
| Network / IT Team | Network access, firewall rules and connectivity support |
| Service Operator | Routine inspection, cleaning and first-line maintenance |
The exact division of work depends on the project contract.
What matters is that every important task has an assigned owner: who supplies it, who installs it, who connects it, who tests it and who provides support after handover.
This is particularly important when the kiosk and locker cabinet are supplied by different manufacturers.
Common Problems That Can Be Avoided During Site Planning
A few issues appear repeatedly in complex kiosk installations, and most can be addressed before production begins.
The cabinet fits, but the doors cannot open properly.
The layout was approved using cabinet dimensions without checking the actual door movement and operating space.
The kiosk is installed in a convenient location, but customers cannot use it comfortably.
The terminal position was selected based on available space rather than the complete user journey.
The hardware works individually, but the system does not communicate correctly.
The host computer was selected before the controller protocol and peripheral interfaces were fully confirmed.
The printer works during testing, but servicing it is difficult.
Paper loading and jam recovery were not considered during the enclosure design.
The kiosk works indoors but has problems at an outdoor site.
The complete enclosure and environmental requirements were not evaluated as one assembled system.
These problems are not always expensive to fix during the design stage. They can become much more difficult once the cabinet has been manufactured and installed.
Smart Locker Kiosk Site Survey Checklist
Use this smart locker site survey checklist before approving the final installation drawing and moving into production.
Project and Workflow
- Application and user workflow documented.
- User groups and expected traffic identified.
- Locker configuration and kiosk arrangement defined.
- Authentication method and peripheral requirements confirmed.
Physical Layout
- Available floor and wall dimensions recorded.
- Locker-bank footprint confirmed.
- Locker door opening clearance checked.
- Kiosk position and customer approach reviewed.
- Queue and service access considered.
Power and Network
- Power availability confirmed.
- Electrical load and distribution reviewed.
- Network availability confirmed at the installation point.
- IT and remote-access requirements documented.
Hardware and Installation
- Host and peripheral interfaces documented.
- Cable routes and connector positions checked.
- Enclosure mounting and maintenance access reviewed.
- Environmental conditions evaluated.
Deployment and Handover
- Final installation drawing approved.
- Responsibility matrix agreed.
- Commissioning tests defined.
- Handover documents identified.
- Maintenance arrangements confirmed.
Frequently Asked Questions
What should be included in a smart locker site survey?
A smart locker site survey should cover the user workflow, available installation space, kiosk position, locker door clearance, accessibility, power, network, hardware interfaces, maintenance access and commissioning requirements.
Does SNROKIOSK supply the complete smart locker system?
SNROKIOSK primarily provides kiosk-side hardware and integration support, including industrial computing, card reading and printing hardware. Locker cabinets, electronic locks, locker controllers and management software are integrated according to the customer’s project architecture and agreed supply scope.
For an overview of the available hardware, see our Smart Locker Kiosk Hardware Solution.
Does the kiosk industrial PC control the electronic locker doors directly?
Not necessarily. Many smart locker systems use a dedicated locker controller between the kiosk host and electronic locks. The actual communication architecture depends on the selected controller and software platform.
See our Smart Locker Controller Integration Guide for more detail.
Should a smart locker kiosk use Ethernet or Wi-Fi?
It depends on the project architecture and installation conditions. Ethernet may be suitable where a wired network is available. Wi-Fi or cellular connectivity may be considered for other installations. The connection should be evaluated at the final kiosk position.
Can a smart locker kiosk be installed outdoors?
Yes, provided the complete kiosk is designed and verified for the actual environmental conditions. The enclosure, installed components, ventilation, cable entries and required protection level must all be considered. An industrial PC alone does not make the complete terminal suitable for outdoor use.
What information should be prepared before requesting a smart locker hardware quotation?
It is helpful to provide the application, site layout, locker-bank drawing, controller model and interface, host operating system, required peripherals, power and network availability, installation environment and estimated quantity.
For projects that require RFID credential issuance, our Smart Locker Card Dispenser Selection Guide also explains the key card handling and integration considerations.
Plan the Installation Before Freezing the Hardware Design
A smart locker project involves more than selecting a cabinet and installing a touchscreen terminal.
The layout, user workflow, hardware interfaces, site infrastructure and maintenance arrangements all need to work together.
Taking the time to review these details before production can prevent unnecessary mechanical changes, installation delays and service problems later.
At SNROKIOSK, we focus on kiosk-side hardware and OEM/ODM integration. Depending on the project, this can include industrial computing platforms, card readers, thermal printers and other hardware modules.
If you are developing a smart locker kiosk, share your locker-bank drawing, controller information, required peripherals and installation conditions with our team.
We can help review the kiosk hardware configuration and identify the information that should be confirmed before the design moves forward.
Explore our Smart Locker Kiosk Hardware Solution or discuss your OEM/ODM project.